Faux Birds Mouth Mast - by Andrew Linn
Original document - in different format - at
http://waderweb.com/plans/fauxbm/fbm_start.htm
Constructing the Faux Bird's Mouth Mast
Also known as the barrel stave mast.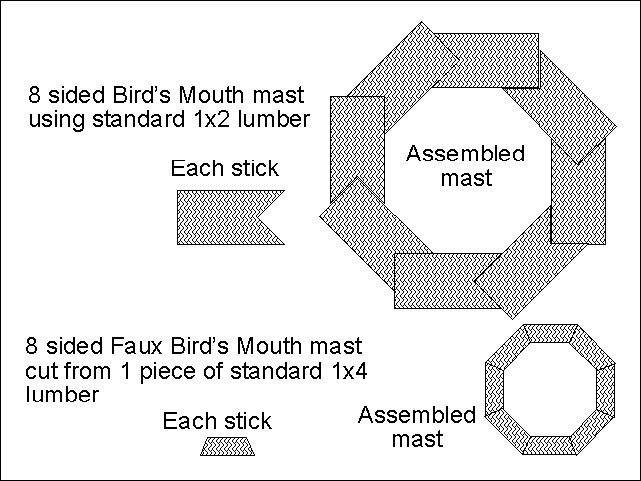
This essay shows how to make a very strong, very lightweight, Faux Bird's Mouth mast from a standard 1x4.
The resulting mast has walls that are 1/4 inch thick and measures just under 2 inches across the flats.
I recommend using clear lumber for this as you will be working with sticks that are very thin and long.
For the same reason, you may want to set up rollers or some method of catching the sticks as you cut them.
2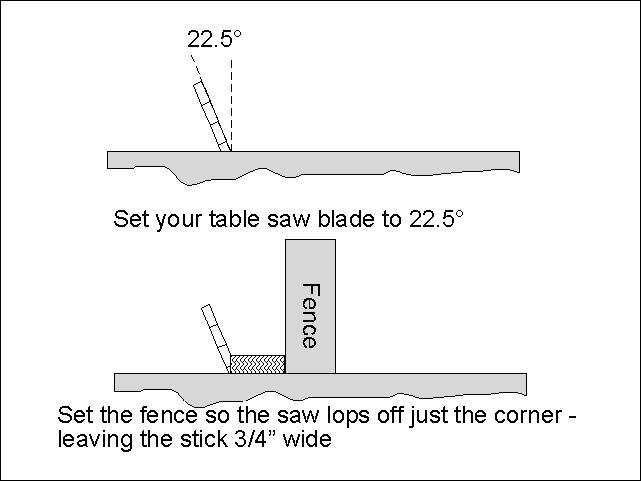
The angle of the edge determines the number of sticks needed to 'complete the circle.'
For an 8-sided mast, the edge angle is 22.5°.
For a 12-sided mast, you'd use a 15° edge angle.
The edge angle is critical and should be set as carefully as possible.
(Editorial comment - If you use epoxy and thicken it minor gaps will be bridged.
PL Premium will probably also bridge minor gaps.)
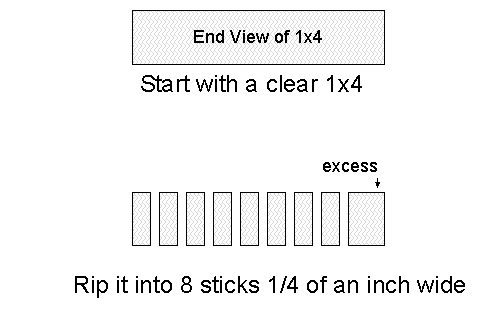
The width of the sticks is also critical - as it determines the diameter of the mast.
Because we cut our sticks from 1x4, all our sticks have a width of 3/4 inches.
3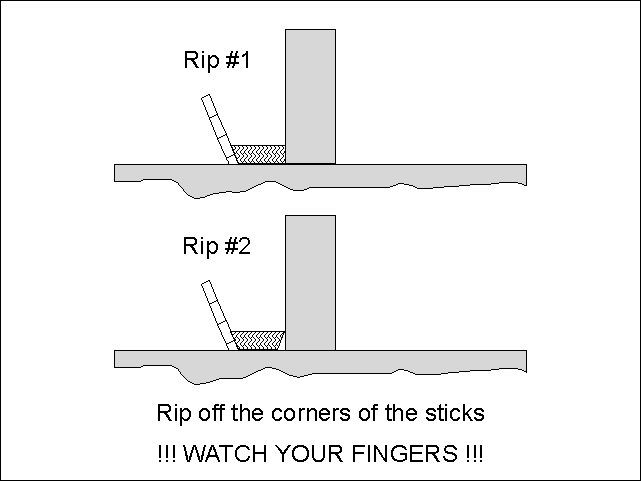
For each stick, lop off the first edge, then swing the stick around and knock off the opposing edge.
Be very careful - a table saw will be just as happy to lop off your fingers in addition to the wood.
4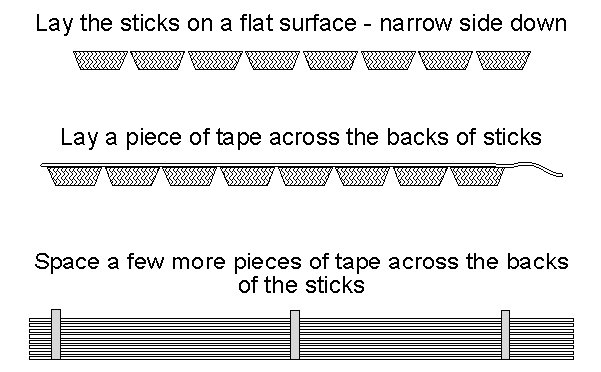
The dangerous part is over. Now it is time to practice assembling the mast.
Lay the sticks on a flat surface with the narrow side down.
Get them aligned and space them a little,
then lay a few pieces of tape across the backs.
5
Using the tape, flip the sticks over and then roll the mast up.
If the sticks don't meet correctly, lay it out, adjust the tape, and try again.
6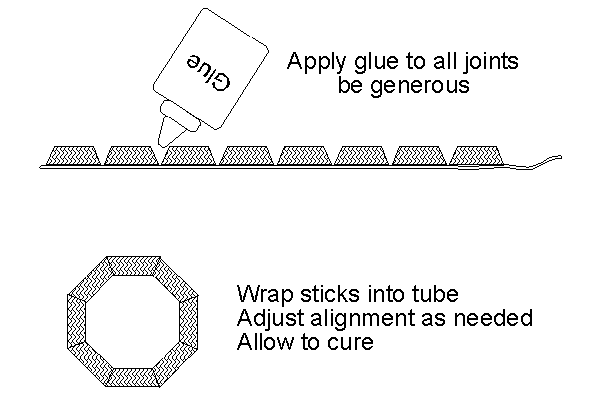
Once the spacing and alignment is correct, you can glue and assemble the mast.
Nearly any glue seems to work: TiteBond II or III, Gorilla Glue, epoxy, and PL Premium have all been tried.
Some people have suggested a trick to help minimize glue runs: When you get the spacing and alignment right, but before you apply the glue, wrap the mast up, then run a line of tape along the OUTSIDE of each seam (except the last seam, of course.) Unwrap the mast, apply the glue, wrap it back up, and then run a line of tape down the last seam.
Once the glue cures and you remove the tape, you have a wonderfully strong, lightweight tube.
I recommend reinforcing the parts of the mast where you will be attaching hardware or sheaves and also where the mast meets the mast step and mast partner.
For my mast, I took a piece of closet rod and trimmed it to fit into the mast tube.
I used a 20-inch piece in the bottom and a 10-inch piece in the top.
The Faux Bird's Mouth process is easily adjusted to make masts and spars of varying diameter and wall thickness. The thickness is purely your choice on how thick you make each stick and the mast diameter is a function of the width of the stick.
To get a rough estimate of the mast diameter, take the width of the sticks, multiply by the number of sticks, and divide by pi. For this mast, the estimator equation is (.75 x 8) / 3.141 = 1.91 inches diameter.
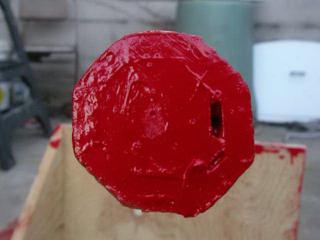
In real life, the mast is about 1.81 inches across the flats and 1.97 across the corners.
If you want to round your mast, make the walls thicker and sand the corners.
1/4 inch thick walls are plenty thick for 10 or 12 ft masts, but you might want to beef things up a bit for longer masts.
It should be possible to connect several of these masts together by inserting a plug at the join (similar to the reinforcing described above.) A true craftsman could probably scarf a bunch of the sticks together and assemble a mast as long as he likes (making sure the joins don't match up, of course.)
~~~~~~
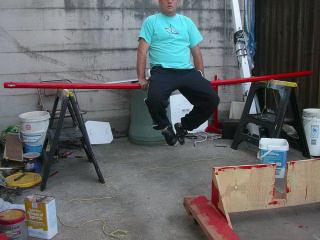
Once the glue cures and you remove the tape, you have a wonderfully strong, lightweight tube.
This is all 210 lbs of me sitting on a 10ft mast made with 1/4 inch thick sticks that were cut from a single 1x4.
You have to admit - that is pretty impressive (the mast, not me or my cluttered workspace.)
I recommend reinforcing the parts of the mast where you will be attaching hardware or sheaves
and also where the mast meets the mast step and mast partner.
For my mast, I took a piece of closet rod and trimmed it to fit into the mast tube.
I used a 20-inch piece in the bottom and a 10-inch piece in the top.
Remember, you do not have to be precise! Just get something in there that will hold the sides out.
If you know the direction of the force, you could even just have a 1/4 inch thick slice of wood in there holding the opposing sides apart.
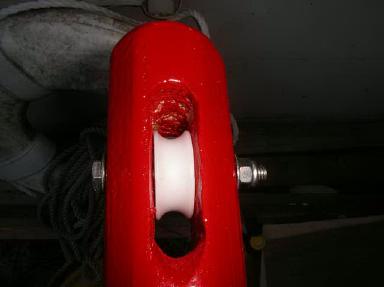
The flats make it real easy to put in sheaves:
just lay the mast on the work table and start drilling your holes.
No clamping, no nothing, just easy as pie.
~~~~~~